
To start lets take a quick review of the overall layout of the game loop:
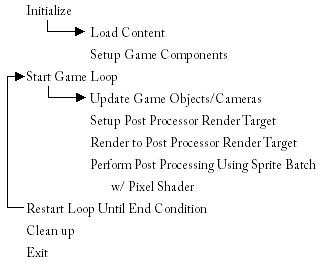
This is a highly simplified version of the actual game loop but we can see from this that the Post Processor redirects the engine's rendering to an off screen image. This image is then post processed by re-drawing the image using a sprite batch and a pixel shader. This allows us to use shaders that can blur/invert colors/tint/shift or do whatever other operation on each pixel of the screen. We can also use this technique to draw 2D images on the screen over the regular scene (GUI Controls also known as a HUD - Heads Up Display)
So here is our modified Game Loop:
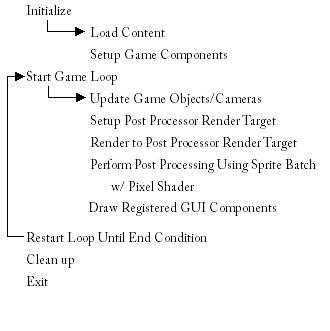
Notice here how we simply add an additional layer to our render stack. This one however will draw images that lay over the top of the post rendered scene. placing this here allows us to avoid modifying the GUI components when we want to post process the scene. Instead we will design our GUI Manager to register controls that can hold their own shader information so each component can have different effects.
Our GUIManager class:
The construction of this manager is fairly straight forward. It simply generates a container utility class that holds a group of GUIComponents which I will explain in a moment. Each registered component is added to the list using the RegisterGUIComponent function. During the loading/updating/drawing functions, we loop through this group and perform the appropriate function. Notice how we use the ref qualifier on the mSpriteBatch variable when loading. This keeps the amount of memory used to draw the objects to a minimum since each component will contain its own drawing loop, this object can be shared.
using Microsoft.Xna.Framework;
using Microsoft.Xna.Framework.Graphics;
using Microsoft.Xna.Framework.Content;
using System.Collections.ObjectModel;
namespace HMEngine3D.HMPostProcessors
{
#region Utility Classes
public class GUIComponentCollection : Collection{ };
#endregion
/**
* GUIManager
* Handles all of the 2D GUI Components that are
* drawn to the screen during game play.
*/
public class GUIManager
{
// Collection of GUI Components
private GUIComponentCollection mGUIComponents;
// Spritebatch to render with
private SpriteBatch mSpriteBatch;
/**
* Constructor
*/
public GUIManager()
{
mGUIComponents = new GUIComponentCollection();
}
/**
* RegisterGUIComponent
* Registers the given component with this
* manager so it knows to draw it.
*
* Parameters:
* aGUIComponent - The GUI Component to register.
*/
public void RegisterGUIComponent(GUIComponent aGUIComponent)
{
mGUIComponents.Add(aGUIComponent);
}
/**
* LoadGraphicsContent
* Loads the Graphics content of each of the
* gui components registered with the manager.
*
* Parameters:
* aDevice - The device to load to.
* aLoader - The content manager to use for loading.
*/
public void LoadGraphicsContent(GraphicsDevice aDevice,
ContentManager aLoader)
{
mSpriteBatch = new SpriteBatch(aDevice);
foreach (GUIComponent lComponent in mGUIComponents)
{
lComponent.LoadGraphicsContent(aDevice, aLoader,
ref mSpriteBatch);
}
}
/**
* Update
* Updates all of the registered GUI Components
*
* Parameters:
* aGameTime - The elapsed time since the last update.
*/
public void Update(GameTime aGameTime)
{
foreach (GUIComponent lComponent in mGUIComponents)
{
lComponent.UpdateComponent(aGameTime);
}
}
/**
* DrawGUI
* Calls the draw function of each registered GUIComponent.
*
* Parameters:
* aDevice - The GraphicsDevice object to draw with.
*/
public void DrawGUI(ref GraphicsDevice aDevice)
{
foreach (GUIComponent lComponent in mGUIComponents)
{
lComponent.DrawComponent(ref aDevice);
}
}
}
}
So how do we construct a GUIComponent? We need to make it abstract! This is important so that way we can extend its functionality by enforcing a set of functions that need to be implemented by extending children classes. This way the GUI Manager knows how to render all of the children no matter what their functionality.
Here is the GUIComponent abstract class:
using Microsoft.Xna.Framework;
using Microsoft.Xna.Framework.Graphics;
using Microsoft.Xna.Framework.Content;
using HMEngine3D.HMShaders;

namespace HMEngine3D.HMPostProcessors
{
/**
 * GUIComponent
 *   Abstract definition of the GUI components that
 *   can be managed by the GUIManager
 */
public abstract class GUIComponent
{

protected Vector2 mPosition = new Vector2(0, 0);
protected string mEffect = "";
protected SpriteBatch mSpriteBatch;
protected RenderTarget2D mRenderTarget;


/**
    * Constructor
    *
    * Parameters:
    *   aPosition - The position of the GUI Component on the screen in pixels.
    *   aEffect - The Shader Effect to use to draw the GUI Component.
    */
public GUIComponent(Vector2 aPosition, string aEffect)
(
 mPosition = aPosition;
 mEffect = aEffect;
}


/**
    * LoadGraphicsContent
    *   Loads the Graphics content, and the sprite batch used in this
    *   component.
    *
    * Parameters:
    *   aDevice - The device to load to.
    *   aLoader - The content manager to use for loading.
    *   aSpriteBatch - The Sprite Batch object to draw with.
    */
public void LoadGraphicsContent(GraphicsDevice aDevice,
                               ContentManager aLoader,
                               ref SpriteBatch aSpriteBatch)
{
 LoadGUIComponents(aDevice, aLoader);
 mSpriteBatch = aSpriteBatch;
 mRenderTarget = new RenderTarget2D(aDevice,
                                    aDevice.Viewport.Width,
                                    aDevice.Viewport.Height,
                                    1,
                                    aDevice.DisplayMode.Format);

 ShaderManager.GetShader(ref mEffect, out mShader);
}

/**
    * LoadGUIComponents
    *   Must be implemented by the extending class.
    *   Loads all the graphics content for this component.
    *
    * Parameters:
    *   aDevice - The device to load to.
    *   aLoader - The content manager to use for loading.
    */
protected abstract void LoadGUIComponents(GraphicsDevice aDevice,
                                         ContentManager aLoader);

/**
    * UpdateComponent
    *   Updates the component for the current state.
    *
    * Parameters:
    *   aElapsedTime - The time since the last update.
    */
public abstract void UpdateComponent(GameTime aElapsedTime);

/**
    * SetPosition
    *   Sets the position of the GUI Component.
    *
    * Parameters:
    *   aPosition - The new position of the upper left corner of the
    *               GUI Component.
    */
public void SetPosition(Vector2 aPosition)
{
 mPosition = aPosition;
}

/**
    * getPosition
    *   Returns the current position of the GUI Component
    *
    * Return Values:
    *   Vector2 - The current position of the
    *             upper left corner of the component.
    */
public Vector2 GetPosition()
{
 return mPosition;
}

/**
    * DrawComponent
    *   Draws the component by setting up render loop and calling
    *   implemented Draw function
    *
    * Parameters:
    *   aDevice - The GraphicsDevice object to draw with
    */
public void DrawComponent(ref GraphicsDevice aDevice)
{

  // hijack the render target to draw the component off screen
 aDevice.SetRenderTarget(0, mRenderTarget);

  // draw the component shader free
 mSpriteBatch.Begin(SpriteBlendMode.AlphaBlend,
                    SpriteSortMode.Immediate,
                    SaveStateMode.SaveState);

 Draw();
 mSpriteBatch.End();

  // resolve render target (normally done by framework but
  // since we took over the draw we have to do it ourselves)
  aDevice.ResolveRenderTarget(0);
 aDevice.SetRenderTarget(0, null);

 if (mEffect != "")
 {
   // set up the effect and sprites
   HMShader lShader = HMShaderManager.GetShader(mEffect);
   if (lShader != null)
   {
     Effect lEffect = lShader.Effect;
     lEffect.Begin();
     mSpriteBatch.Begin(SpriteBlendMode.AlphaBlend,
                        SpriteSortMode.Immediate,
                        SaveStateMode.SaveState);

     // draw the sprites
     foreach (EffectPass lPass in lEffect.CurrentTechnique.Passes)
     {
       lPass.Begin();
       mSpriteBatch.Draw(mRenderTarget.GetTexture(),
                         new Vector2(0, 0), Color.White);
       lPass.End();
     }

     mSpriteBatch.End();
     lEffect.End();
   }
 }
}

/**
    * Draw
    *   Must be implemented by extending classes.
    *   Defines how to draw this Component.
    *
    * Parameters:
    *   aSpriteBatch - The SpriteBatch object to draw with.
    */
protected abstract void Draw();
}
}
*Note: If we look in the DrawComponents function, we see a reference to the HMShaderManager class, this is part of the Hazy Mind engine and simply maps Shaders that we pre-load to given names. This saves on memory and loading time.
So as we can see here, there are 3 abstract functions:
- LoadGUIComponents - used to load the specific assets for the component, is called by the loading function of the GUIManager.
- UpdateComponent - used to update the component based on the elapsed time, called by the Update function of the GUIManager.
- Draw - used to draw the component using the passed in Sprite Batch reference, called by the DrawComponents function of the GUIComponent class, this sets up the render loop for
* note I have recently updated this section to fix a problem with sprite tinting, I have instead used the method of rendering off screen the contents of the components prior to rendering the component using the defined shader associated with the component. This allows for the basic sprite batch shader to handle tinting of sprites.
In the next tutorial, I will show you how to extend this abstract class to make a GUI component object. I will also show you how to interlace this GUIManager with the Hazy Mind engine, or any other engine that uses a standard game loop.
No comments:
Post a Comment