
Remember, there are three important functions that need to be extended. These are the LoadGUIComponents, UpdateComponent, and Draw
Lets first discuss the type of component that we are going to make. We will be starting off with something simple that doesn't update to keep this tutorial hopefully short. Lets start with some simple GUI prototyping (placing test objects on the screen to get a feel for how the GUI will look). This way, we can spend less time trying to re-shuffle GUI elements around the screen later when we realize that our idea doesn't look good or fit and we have already spent a lot of time developing animation sequences/functionality/etc...
Lets start with a simple health bar, I whipped this image up really fast, it is in a .png format so the corners are transparent. This will be transparent in the game because if we look back at our GUIComponent class where we perform the draw loop, we can see that we have set up the SpriteBatch.Begin() function with the parameter SpriteBlendMode.AlphaBlend:

Not so exciting I know, but it took like 5 minutes, maybe I'll replace it later with something fancy. In the mean time, lets look at how to put this fine piece of artwork on the screen.
Lets add this image to the content directory of our game under a folder called textures for now. It can be moved later if you do not like it, or if you have some special hierarchy set up for each component in your GUI.
Here is our extended class of the GUIComponent, lets call it TestHUD:
using HMEngine3D.HMPostProcessors;
using Microsoft.Xna.Framework.Graphics;
using Microsoft.Xna.Framework.Content;
using Microsoft.Xna.Framework;

namespace HMDemo.Content.TestObjects
{
/**
 * TestHud
 *   Test Hud object for testing gui components on the HUD.
 *   It is an implementation of the GUIComponent Abstract class.
 *   It contains no interaction or animation.
 */
public class TestHud : GUIComponent
{

 private string mAsset;    // the name of the texture file to use
 private Texture2D mTexture;   // the texture to use.

 /**
   * Constructor
   *
   * Parameters:
   *   aAsset - The prototype image to draw to the screen.
   *   aPosition - The X,Y position to draw the object.
   *   aEffect - The Shader to draw the object with.
   */
 public TestHud(string aAsset, Vector2 aPosition, string aEffect)
    : base(aPosition, aEffect)
 {
   mAsset = aAsset;
 }

 /**
   * LoadGUIComponents
   *   LoadGUIComponents is an overwritten method of the abstract class
   *   GUIComponent. It must be implemented by this extending class to
   *   load component specific GUI element assets.
   *
   * Parameters:
   *   aDevice - The GraphicsDevice load the graphics to.
   *   aLoader - The ContentManager to load with.
   */
 protected override void LoadGUIComponents(GraphicsDevice aDevice,
                                           ContentManager aLoader)
 {
   // load the texture asset
   mTexture = aLoader.Load(mAsset);
 }

 /**
   * UpdateComponent
   *   UpdateComponent is an overwritten method of the abstract class
   *   GUIComponent. It must be implemented by this extending class to
   *   update the component specific GUI elements.
   *   It currently does nothing in this class as this is only for
   *   rapid prototype testing.
   *
   * Parameters:
   *   aElapsedTime - The elapsed time since the last update.
   */
 public override void UpdateComponent(GameTime aElapsedTime)
 {
   // do nothing yet
 }

 /**
   * Draw
   *   Draw is an overwritten method of the abstract class
   *   GUIComponent. It must be implemented by this extending class to
   *   draw the component specific GUI elements.
   */
 protected override void Draw()
 {
   mSpriteBatch.Draw(mTexture, mPosition, Color.White);
 }
}
}
Ok, so now that we have a TestHud class, we can create one of these objects and pass our asset (the ugly health bar image) to the constructor as the asset, along with a position for it to display on the screen and an effect which should be a simple pixel shader (or more complex if you have some sort of special effect in mind).
We do this in our main initialization block of our code. In my case, I have a DemoGame class that has a Main method as the launch point of my application, this DemoGame contains an instance of my Engine code (or Game class as it is called by Microsoft). In the Main function, I set up all of my game objects, this is also where we are going to set up our HUD objects and register them with the manager.
Oh wait, we haven't put our GUIManager anywhere yet... that could be a problem when we go to register our HUD objects right? Well lets see where we want to put that. Since we so conveniently have a copy of our extended Game object near by, we should probably place it somewhere in there.
In your Game class, place a member variable at the top called:
protected GUIManager mGUIManager; // the gui manager
I know I am so original.
We then want to add some accessor methods to this class:
public GUIManager GUIManager
{
get
{
  return mGUIManager;
}
}
And now we add some method calls in some key places to instantiate, initialize, update and draw:
In our constructor add:
mGUIManager = new GUIManager();
In our LoadGraphicsContent method add:
// load GUI Manager registered objects content
mGUIManager.LoadGraphicsContent(mGraphics.GraphicsDevice, mContent);
In our Update method add:
// update all the GUI Controls
mGUIManager.Update(aGameTime);
Finally, in our Draw method, and this is important, AT THE VERY END add:
mGUIManager.DrawGUI(ref aDevice);
This will draw the HUD on top of what is drawn by the post processor. This will keep the HUD unaffected by what the Post Processor does no matter what type of shader is used.
Now all we have to do is create an instance of our TestHud object and place this in our Main function of the game, we also need to register it with the GUIManager like so:
// create GUI
TestHud lTestHUD = new TestHud(@"Content/Textures/guiconcept", Vector2.Zero, "GT");
mGame.GUIManager.RegisterGUIComponent(lTestHUD);
*Note here, the "GT" parameter is the name of a basic pixel shader that I have mapped to this name via the ShaderManager described in the Hazy Mind Tutorials. It is recalled by the DrawComponent function of our GUIComponent class.
This should give us the results shown below.
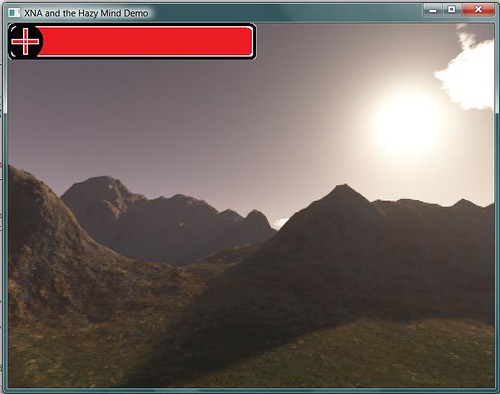
As we can see, our Health bar shows up as we had hoped. Now if we want to make new GUI components, we can simply build a library of easily extended GUIComponents that only require us to implement 3 functions and add two lines of code to our main class to see immediate results. I hope that this will save you time in not only implementing sweet GUI Components for your Indy games, but also speeds up rapid prototyping for you. Please feel free to either e-mail me or post comments with any questions or... well... comments that you may have.
No comments:
Post a Comment