Site Sections

Friday, October 26, 2007

Optimizations - Simple and Effective

I was working on my engine the other night, trying to get my new managers to work with a simple map parser that I am working on (I will be putting up the tutorials on the managers in a few days), and I noticed that I was starting to get some major slow down while rendering models, especially when I got any more than say 20 objects on the screen. Lag city I tell ya! It was really depressing.

Time to optimize...

C#, like many languages (especially C/C++) give you the option to pass values by reference. This means that instead of "passing by value" meaning copying the contents of a variable into another stack variable created for the called functions parameters, we instead simply create a reference (or pointer) to the location in memory where the passed variable is stored. This works great for larger objects as we do not want to have to create a separate copy of every object we want to pass as a parameter, especially if we are passing the object down a couple of calls.

This was my first optimization that I noticed I could perform. Now C# has two forms of pass by reference when dealing with function calls:
  1. Simply to pass a reference to a function by identifying it with the "ref" keyword, this must be placed in the function definition and the function call.
  2. Passing return variables by reference, this requires the use of the "out" keyword before the return variable INSIDE of the parameter list. We do not return these variables as normal, instead we can assign them a value and it acts as if we are assigning the value to the variable from the calling function scope. This is much faster than using standard returns when using them for assignment operations, also it allows for multiple return values. I have modified my managers to use this form of returning when doing searches for objects contained within.
This sped up the Hazy Mind engine quite a bit on its own. I did notice a major improvement when it came to the return speed on the shader manager. This got me thinking as to why the shader manager was giving me such poor performance. I started looking around and I noticed that in all the draw loops for objects, the Hazy Mind engine uses the shader manager to request the shader to draw with every time through the draw loop.

Hmmmm, I think to myself, why are we doing this? I am assuming it was in case someone wanted to change the shader of an object in the middle of the game? Well why not then move this expensive search cost to the setShader function and store a "reference" to these objects locally. Small memory hit, vast performance increase. We amortize the cost of searching to constant (actually practically nothing since we shouldn't need to change shaders on specific objects very often) and tada! almost instant improvement in speed, I can have many more objects on the screen with no lag. I have my render framerate fixed and it doesn't jump at all. I can imagine that my unfixed frame rate would now be through the roof.

So key things to remember:
  1. Use pass by ref, especially in functions that you are not going to change the state of the parameter objects. It really isn't all that much of a benefit on basic data types as their size is pretty much the same as the size of the reference.
  2. Use out return parameters for managers that return bulky objects such as models.
  3. keep search times low by not putting them in draw loops (this is very very important!)
Hope this helps!

Wednesday, October 17, 2007

Engine work again!

Well, it looks like I have found some time to do some more work on the engine. Last night I started writing a few more managers to handle static textures and models for my next goal of building a level editor. I noticed that the Hazy mind engine loads each texture and model at the time that the the load content function is called. It also loads the same texture multiple times if the developer creates multiple copies of the same object. I think that I can streamline this assuming that I know what textures and models are going to be loaded like a library.

This would make sense in a standard game as I can develop a map file that contains a list of all the assets that are going to be used in a level. These can be loaded into a manager and used like a lookup table when they are required.

When I get this functionality fully working I will post a tutorial here. Check back soon!

Tuesday, October 9, 2007

Car Troubles...

Man, sometimes I just feel like quitting driving. If only I could, I think I would. Not only would it save me the money in gas, but also from dealing with leaking radiators, bad service at Precision Auto, and all around car problems.

So here is my story:

My car was overheating, it would take radiator fluid while it was cool and it wouldn't leak. Turns out that when I ran it, it would still overheat no matter how much coolant I put in it. Also when I turned off the car, it would leak like a siv from the front corner of my driver side. I looked under the hood, and it didn't seem like any hose was leaking that I could see, so off to Precision Auto to get it checked out for radiator leaks. They look at it, never call me back with an estimate, figure out apparently that a clamp on a hose has come loose. I call them a few hours later right before they close and they say this to me and tell me that they have already fixed it, without my consent. I should have told them that, that was it and I wasn't going to pay them since they never called me back. Well, I was just happy to have my car fixed I paid it, whatever. Turns out it was 48 dollars in labor just to fix a clamp and run a pressure test. They tell me it turned out ok, radiator holds pressure, cost me a buck for a new clamp.

I drive it home, no overheating, so I'm happy right? Drive it to work and I didn't even pay attention to whether or not it was fixed, it seemed to be running fine. I get out of work just as Precision is about to close and notice that my heat is rising again... now I'm pissed right? They said it should be fixed. I get it home and look, sure enough, still leaking. I pull out my cell and give Precision a call back, and they say "Oh it might be your thermostat sticking, I can get you in on Thursday".

This is ridiculous, I shouldn't have to pay for service again, and this time I tell you I won't. Parts maybe but definitely not labor, it's their fault, they told me it was fixed. Moral of the story, walk or ride a bike, it's healthier, better for the environment, and a whole lot cheaper. If only I could, too bad I live in the U.P. of Michigan...

... needless to say, I have been dealing with either trying to find a new car to purchase or fix this one, not so much working on my game... Very sad :( hoping to get back to it soon, right after I beat Resident Evil for GC.

Monday, October 1, 2007

Woot for scanners

Yay! I finally got my new scanner on Friday, unfortunately I have had absolutely no time to play with it yet. I got the software installed just before I had to take off for the weekend to Marquette. Well, hopefully I will get the chance to play with it tonight and get some pictures that I have drawn up here.

As far as the scanner is concerned though, it is a Canoscan Lide 25 from Canon, it is a nice little scanner, smaller than a 17 inch widescreen laptop and fits in my laptop bag. The best part though is that it doesn't have a power supply, it is powered solely through the USB cable. This is nice for those crazy occasions where you are on the road and your life depends on scanning an image into your laptop on the go. (I don't know when that would be but just in case...) You can check it out here - (NewEgg) if you would like to get one yourself, they are cheap, only 60 bucks! Woot!

Friday, September 28, 2007

Resident Evil Revisited

Man, sometimes I love digging up a classic and playing through the experience one more time, especially when it is one of my favorite games of all times. In this case, it is two of my favorite games of all times, only because it was remade and so well done. Thats right, Resident Evil for the GameCube. I started playing it again the other night (I haven't seen the new movie yet and had watched the first two in preparation for tonights viewing). I wanted to show my girlfriend the intro to the GameCube version because she has never seen a Resident Evil game before. She thought it was good graphics for the system (which I would have to agree for its time) and that the overall feel of the environments were genuinely creepy.

I haven't played the remake all the way through, when I first got it I had been playing Super Smash Bros. and Zelda Windwaker like crazy and didn't really have time to play through a game that I had beat for the playstation when I was like 12. Yea it was pretty and supposedly it had additional content, whatever right? Playing through it again I can just not believe how much they improved on the classic. It is so much spookier than the original, yet all of the great original content is there in some form or the other.

For those of you out there that can't stand playing games that are more than a week old (and I know you exist - I use to be one of you) go back and play this game again, it is well worth your trouble in a time when we are all still waiting for spore...

Tuesday, September 25, 2007

GUI Manager Tutorial Pt. 2

So today we are going to talk about how to extend the abstract class of the GUIComponent that I showed you last time.

Remember, there are three important functions that need to be extended. These are the LoadGUIComponents, UpdateComponent, and Draw

Lets first discuss the type of component that we are going to make. We will be starting off with something simple that doesn't update to keep this tutorial hopefully short. Lets start with some simple GUI prototyping (placing test objects on the screen to get a feel for how the GUI will look). This way, we can spend less time trying to re-shuffle GUI elements around the screen later when we realize that our idea doesn't look good or fit and we have already spent a lot of time developing animation sequences/functionality/etc...

Lets start with a simple health bar, I whipped this image up really fast, it is in a .png format so the corners are transparent. This will be transparent in the game because if we look back at our GUIComponent class where we perform the draw loop, we can see that we have set up the SpriteBatch.Begin() function with the parameter SpriteBlendMode.AlphaBlend:



Not so exciting I know, but it took like 5 minutes, maybe I'll replace it later with something fancy. In the mean time, lets look at how to put this fine piece of artwork on the screen.

Lets add this image to the content directory of our game under a folder called textures for now. It can be moved later if you do not like it, or if you have some special hierarchy set up for each component in your GUI.

Here is our extended class of the GUIComponent, lets call it TestHUD:

using HMEngine3D.HMPostProcessors;
using Microsoft.Xna.Framework.Graphics;
using Microsoft.Xna.Framework.Content;
using Microsoft.Xna.Framework;

namespace HMDemo.Content.TestObjects
{
/**
* TestHud
* Test Hud object for testing gui components on the HUD.
* It is an implementation of the GUIComponent Abstract class.
* It contains no interaction or animation.
*/
public class TestHud : GUIComponent
{

private string mAsset; // the name of the texture file to use
private Texture2D mTexture; // the texture to use.

/**
* Constructor
*
* Parameters:
* aAsset - The prototype image to draw to the screen.
* aPosition - The X,Y position to draw the object.
* aEffect - The Shader to draw the object with.
*/
public TestHud(string aAsset, Vector2 aPosition, string aEffect)
: base(aPosition, aEffect)
{
mAsset = aAsset;
}

/**
* LoadGUIComponents
* LoadGUIComponents is an overwritten method of the abstract class
* GUIComponent. It must be implemented by this extending class to
* load component specific GUI element assets.
*
* Parameters:
* aDevice - The GraphicsDevice load the graphics to.
* aLoader - The ContentManager to load with.
*/
protected override void LoadGUIComponents(GraphicsDevice aDevice,
ContentManager aLoader)
{
// load the texture asset
mTexture = aLoader.Load(mAsset);
}

/**
* UpdateComponent
* UpdateComponent is an overwritten method of the abstract class
* GUIComponent. It must be implemented by this extending class to
* update the component specific GUI elements.
* It currently does nothing in this class as this is only for
* rapid prototype testing.
*
* Parameters:
* aElapsedTime - The elapsed time since the last update.
*/
public override void UpdateComponent(GameTime aElapsedTime)
{
// do nothing yet
}

/**
* Draw
* Draw is an overwritten method of the abstract class
* GUIComponent. It must be implemented by this extending class to
* draw the component specific GUI elements.
*/
protected override void Draw()
{
mSpriteBatch.Draw(mTexture, mPosition, Color.White);
}
}
}


Ok, so now that we have a TestHud class, we can create one of these objects and pass our asset (the ugly health bar image) to the constructor as the asset, along with a position for it to display on the screen and an effect which should be a simple pixel shader (or more complex if you have some sort of special effect in mind).

We do this in our main initialization block of our code. In my case, I have a DemoGame class that has a Main method as the launch point of my application, this DemoGame contains an instance of my Engine code (or Game class as it is called by Microsoft). In the Main function, I set up all of my game objects, this is also where we are going to set up our HUD objects and register them with the manager.

Oh wait, we haven't put our GUIManager anywhere yet... that could be a problem when we go to register our HUD objects right? Well lets see where we want to put that. Since we so conveniently have a copy of our extended Game object near by, we should probably place it somewhere in there.

In your Game class, place a member variable at the top called:

protected GUIManager mGUIManager; // the gui manager

I know I am so original.

We then want to add some accessor methods to this class:

public GUIManager GUIManager
{
get
{
return mGUIManager;
}
}


And now we add some method calls in some key places to instantiate, initialize, update and draw:

In our constructor add:

mGUIManager = new GUIManager();

In our LoadGraphicsContent method add:

// load GUI Manager registered objects content
mGUIManager.LoadGraphicsContent(mGraphics.GraphicsDevice, mContent);

In our Update method add:

// update all the GUI Controls
mGUIManager.Update(aGameTime);

Finally, in our Draw method, and this is important, AT THE VERY END add:

mGUIManager.DrawGUI(ref aDevice);

This will draw the HUD on top of what is drawn by the post processor. This will keep the HUD unaffected by what the Post Processor does no matter what type of shader is used.

Now all we have to do is create an instance of our TestHud object and place this in our Main function of the game, we also need to register it with the GUIManager like so:

// create GUI
TestHud lTestHUD = new TestHud(@"Content/Textures/guiconcept", Vector2.Zero, "GT");
mGame.GUIManager.RegisterGUIComponent(lTestHUD);


*Note here, the "GT" parameter is the name of a basic pixel shader that I have mapped to this name via the ShaderManager described in the Hazy Mind Tutorials. It is recalled by the DrawComponent function of our GUIComponent class.

This should give us the results shown below.
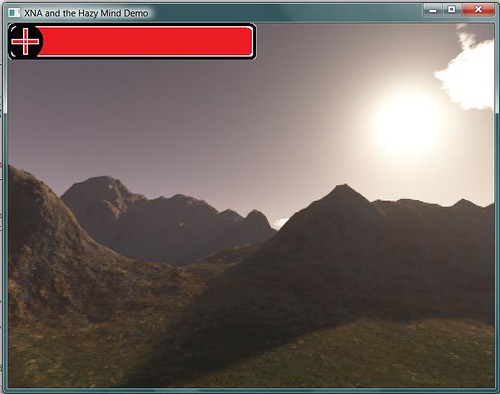

As we can see, our Health bar shows up as we had hoped. Now if we want to make new GUI components, we can simply build a library of easily extended GUIComponents that only require us to implement 3 functions and add two lines of code to our main class to see immediate results. I hope that this will save you time in not only implementing sweet GUI Components for your Indy games, but also speeds up rapid prototyping for you. Please feel free to either e-mail me or post comments with any questions or... well... comments that you may have.

Monday, September 24, 2007

GUI Manager Tutorial Pt. 1

Well... the time has come finally for me to start my tutorial series for the GUI Manager built off of the Hazy Mind engine. It is really important that you understand the structure of this architecture prior to reading this tutorial. What I will discuss should be helpful for other architectures and probably could easily be adapted to work with them. The concept is very OOP, yet knowing how the Hazy Mind post processor is constructed will save us a lot of time. Go Here to review these tutorials if you haven't yet.

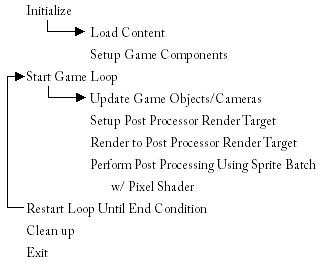
To start lets take a quick review of the overall layout of the game loop:


This is a highly simplified version of the actual game loop but we can see from this that the Post Processor redirects the engine's rendering to an off screen image. This image is then post processed by re-drawing the image using a sprite batch and a pixel shader. This allows us to use shaders that can blur/invert colors/tint/shift or do whatever other operation on each pixel of the screen. We can also use this technique to draw 2D images on the screen over the regular scene (GUI Controls also known as a HUD - Heads Up Display)

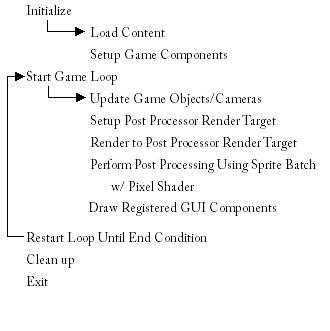
So here is our modified Game Loop:


Notice here how we simply add an additional layer to our render stack. This one however will draw images that lay over the top of the post rendered scene. placing this here allows us to avoid modifying the GUI components when we want to post process the scene. Instead we will design our GUI Manager to register controls that can hold their own shader information so each component can have different effects.

Our GUIManager class:

using Microsoft.Xna.Framework;
using Microsoft.Xna.Framework.Graphics;
using Microsoft.Xna.Framework.Content;
using System.Collections.ObjectModel;

namespace HMEngine3D.HMPostProcessors
{
#region Utility Classes
public class GUIComponentCollection : Collection { };
#endregion

/**
* GUIManager
* Handles all of the 2D GUI Components that are
* drawn to the screen during game play.
*/
public class GUIManager
{

// Collection of GUI Components
private GUIComponentCollection mGUIComponents;

// Spritebatch to render with
private SpriteBatch mSpriteBatch;

/**
* Constructor
*/
public GUIManager()
{
mGUIComponents = new GUIComponentCollection();
}

/**
* RegisterGUIComponent
* Registers the given component with this
* manager so it knows to draw it.
*
* Parameters:
* aGUIComponent - The GUI Component to register.
*/
public void RegisterGUIComponent(GUIComponent aGUIComponent)
{
mGUIComponents.Add(aGUIComponent);
}

/**
* LoadGraphicsContent
* Loads the Graphics content of each of the
* gui components registered with the manager.
*
* Parameters:
* aDevice - The device to load to.
* aLoader - The content manager to use for loading.
*/
public void LoadGraphicsContent(GraphicsDevice aDevice,
ContentManager aLoader)
{
mSpriteBatch = new SpriteBatch(aDevice);
foreach (GUIComponent lComponent in mGUIComponents)
{
lComponent.LoadGraphicsContent(aDevice, aLoader,
ref mSpriteBatch);
}
}

/**
* Update
* Updates all of the registered GUI Components
*
* Parameters:
* aGameTime - The elapsed time since the last update.
*/
public void Update(GameTime aGameTime)
{
foreach (GUIComponent lComponent in mGUIComponents)
{
lComponent.UpdateComponent(aGameTime);
}
}

/**
* DrawGUI
* Calls the draw function of each registered GUIComponent.
*
* Parameters:
* aDevice - The GraphicsDevice object to draw with.
*/
public void DrawGUI(ref GraphicsDevice aDevice)
{
foreach (GUIComponent lComponent in mGUIComponents)
{
lComponent.DrawComponent(ref aDevice);
}
}
}
}

The construction of this manager is fairly straight forward. It simply generates a container utility class that holds a group of GUIComponents which I will explain in a moment. Each registered component is added to the list using the RegisterGUIComponent function. During the loading/updating/drawing functions, we loop through this group and perform the appropriate function. Notice how we use the ref qualifier on the mSpriteBatch variable when loading. This keeps the amount of memory used to draw the objects to a minimum since each component will contain its own drawing loop, this object can be shared.

So how do we construct a GUIComponent? We need to make it abstract! This is important so that way we can extend its functionality by enforcing a set of functions that need to be implemented by extending children classes. This way the GUI Manager knows how to render all of the children no matter what their functionality.

Here is the GUIComponent abstract class:

using Microsoft.Xna.Framework;
using Microsoft.Xna.Framework.Graphics;
using Microsoft.Xna.Framework.Content;
using HMEngine3D.HMShaders;

namespace HMEngine3D.HMPostProcessors
{
/**
* GUIComponent
* Abstract definition of the GUI components that
* can be managed by the GUIManager
*/
public abstract class GUIComponent
{

protected Vector2 mPosition = new Vector2(0, 0);
protected string mEffect = "";
protected SpriteBatch mSpriteBatch;
protected RenderTarget2D mRenderTarget;


/**
* Constructor
*
* Parameters:
* aPosition - The position of the GUI Component on the screen in pixels.
* aEffect - The Shader Effect to use to draw the GUI Component.
*/
public GUIComponent(Vector2 aPosition, string aEffect)
(
mPosition = aPosition;
mEffect = aEffect;
}


/**
* LoadGraphicsContent
* Loads the Graphics content, and the sprite batch used in this
* component.
*
* Parameters:
* aDevice - The device to load to.
* aLoader - The content manager to use for loading.
* aSpriteBatch - The Sprite Batch object to draw with.
*/
public void LoadGraphicsContent(GraphicsDevice aDevice,
ContentManager aLoader,
ref SpriteBatch aSpriteBatch)
{
LoadGUIComponents(aDevice, aLoader);
mSpriteBatch = aSpriteBatch;
mRenderTarget = new RenderTarget2D(aDevice,
aDevice.Viewport.Width,
aDevice.Viewport.Height,
1,
aDevice.DisplayMode.Format);

ShaderManager.GetShader(ref mEffect, out mShader);
}

/**
* LoadGUIComponents
* Must be implemented by the extending class.
* Loads all the graphics content for this component.
*
* Parameters:
* aDevice - The device to load to.
* aLoader - The content manager to use for loading.
*/
protected abstract void LoadGUIComponents(GraphicsDevice aDevice,
ContentManager aLoader);

/**
* UpdateComponent
* Updates the component for the current state.
*
* Parameters:
* aElapsedTime - The time since the last update.
*/
public abstract void UpdateComponent(GameTime aElapsedTime);

/**
* SetPosition
* Sets the position of the GUI Component.
*
* Parameters:
* aPosition - The new position of the upper left corner of the
* GUI Component.
*/
public void SetPosition(Vector2 aPosition)
{
mPosition = aPosition;
}

/**
* getPosition
* Returns the current position of the GUI Component
*
* Return Values:
* Vector2 - The current position of the
* upper left corner of the component.
*/
public Vector2 GetPosition()
{
return mPosition;
}

/**
* DrawComponent
* Draws the component by setting up render loop and calling
* implemented Draw function
*
* Parameters:
* aDevice - The GraphicsDevice object to draw with
*/
public void DrawComponent(ref GraphicsDevice aDevice)
{

// hijack the render target to draw the component off screen
aDevice.SetRenderTarget(0, mRenderTarget);

// draw the component shader free
mSpriteBatch.Begin(SpriteBlendMode.AlphaBlend,
SpriteSortMode.Immediate,
SaveStateMode.SaveState);

Draw();
mSpriteBatch.End();

// resolve render target (normally done by framework but
// since we took over the draw we have to do it ourselves)
aDevice.ResolveRenderTarget(0);
aDevice.SetRenderTarget(0, null);

if (mEffect != "")
{
// set up the effect and sprites
HMShader lShader = HMShaderManager.GetShader(mEffect);
if (lShader != null)
{
Effect lEffect = lShader.Effect;
lEffect.Begin();
mSpriteBatch.Begin(SpriteBlendMode.AlphaBlend,
SpriteSortMode.Immediate,
SaveStateMode.SaveState);

// draw the sprites
foreach (EffectPass lPass in lEffect.CurrentTechnique.Passes)
{
lPass.Begin();
mSpriteBatch.Draw(mRenderTarget.GetTexture(),
new Vector2(0, 0), Color.White);
lPass.End();
}

mSpriteBatch.End();
lEffect.End();
}
}
}

/**
* Draw
* Must be implemented by extending classes.
* Defines how to draw this Component.
*
* Parameters:
* aSpriteBatch - The SpriteBatch object to draw with.
*/
protected abstract void Draw();
}
}


*Note: If we look in the DrawComponents function, we see a reference to the HMShaderManager class, this is part of the Hazy Mind engine and simply maps Shaders that we pre-load to given names. This saves on memory and loading time.

So as we can see here, there are 3 abstract functions:
  • LoadGUIComponents - used to load the specific assets for the component, is called by the loading function of the GUIManager.
  • UpdateComponent - used to update the component based on the elapsed time, called by the Update function of the GUIManager.
  • Draw - used to draw the component using the passed in Sprite Batch reference, called by the DrawComponents function of the GUIComponent class, this sets up the render loop for
this component and allows each component to contain its own shader effect.

* note I have recently updated this section to fix a problem with sprite tinting, I have instead used the method of rendering off screen the contents of the components prior to rendering the component using the defined shader associated with the component. This allows for the basic sprite batch shader to handle tinting of sprites.

In the next tutorial, I will show you how to extend this abstract class to make a GUI component object. I will also show you how to interlace this GUIManager with the Hazy Mind engine, or any other engine that uses a standard game loop.